Return to Table of Contents
- The WYSIWYG text editor
- Inserting media (images, documents, remotely-hosted videos)
- Inserting iframes
- Creating anchors
The WYSIWYG text editor
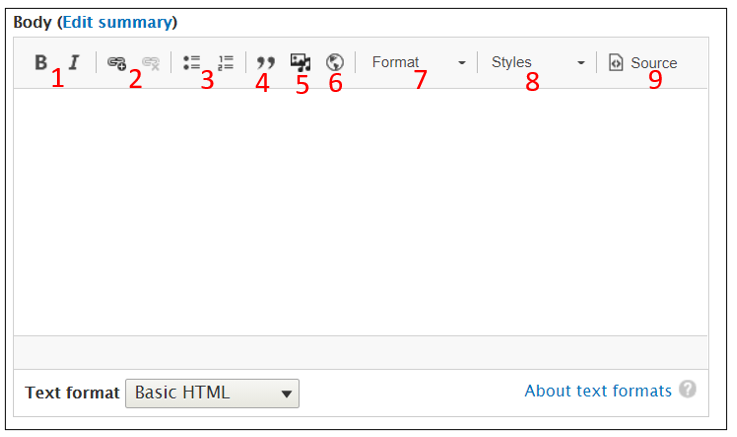
“Body” content in all content types is entered using a WYSIWYG text editor. It functions similar to Word. If you copy & paste text from Word into the editor, it will give you the option to clean up the text so that you don’t bring over unnecessary markup.
Drupal allows you to:
- Bold and italicize text. (Note there is no option for underline, as users expect underlined text to be a link)
- Insert and remove hyperlinks
- Insert bulleted or numbered lists
- Insert a block quote (a separated & indented quote used when quoting long passages)
- Insert an image, document, or a remotely-hosted video (see Inserting media for additional details)
- Insert an iframe onto the page (see Inserting iframes for more information)
- Create headings (see WebAIM's page for structuring headings correctly for accessibility)
- Where applicable, add a specific style to your text (for example, to stylize a list of anchor links at the top of the page). This will be greyed out unless you have text that a style applies to. (See Creating anchors for additional details)
- View the HTML code for your text
Inserting media
To insert an image, document, or remotely-hosted video, click on the media button in the WYSIWYG editor (labeled #5 in the WYSIWYG editor screenshot at the top of this page).
Images
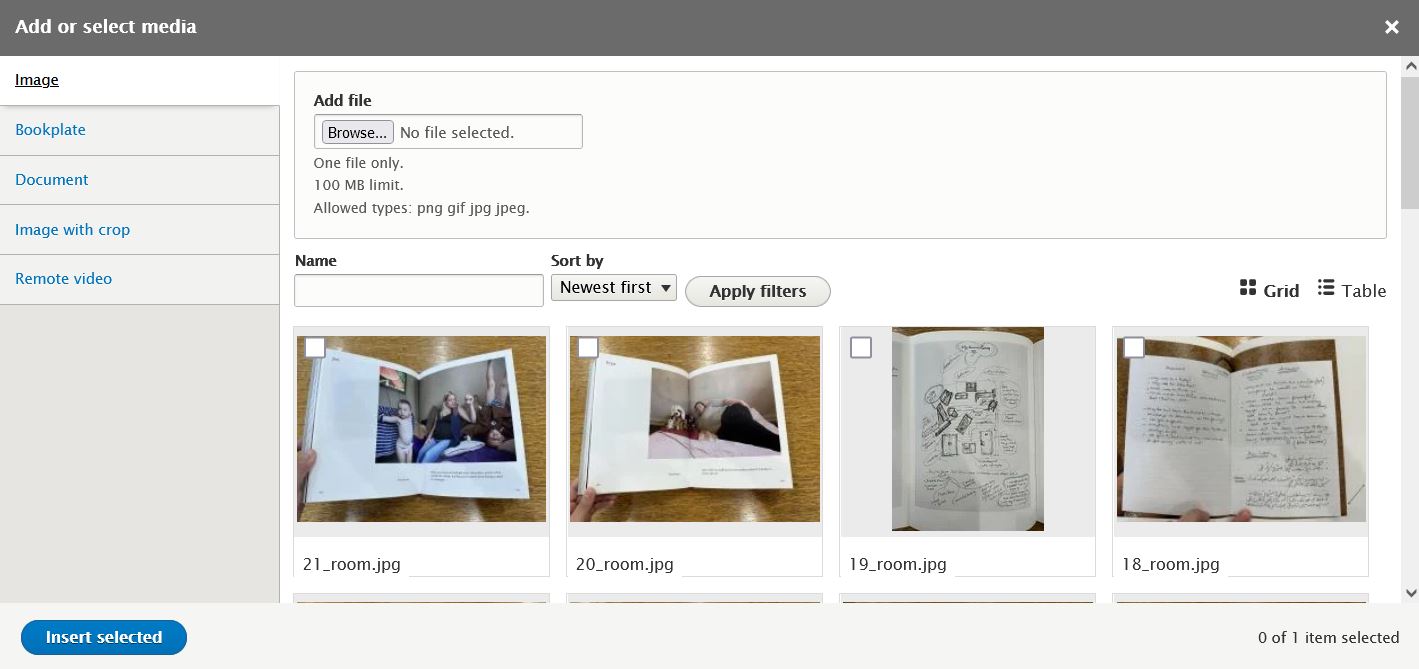
To insert an image, select the Image tab. If the image you want to use has already been loaded into the website, select it from the images in the gallery and click the Insert selected button. If you don't see an image you know has already been loaded into the site, check in the Image with crop tab.
If your image isn’t already there, click the Browse... button to upload it. Enter Alternative text for the image (a short written description that is read aloud to users of screen readers) and click Save. Then select your image from the gallery.
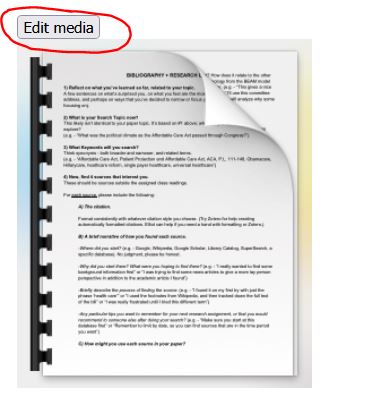
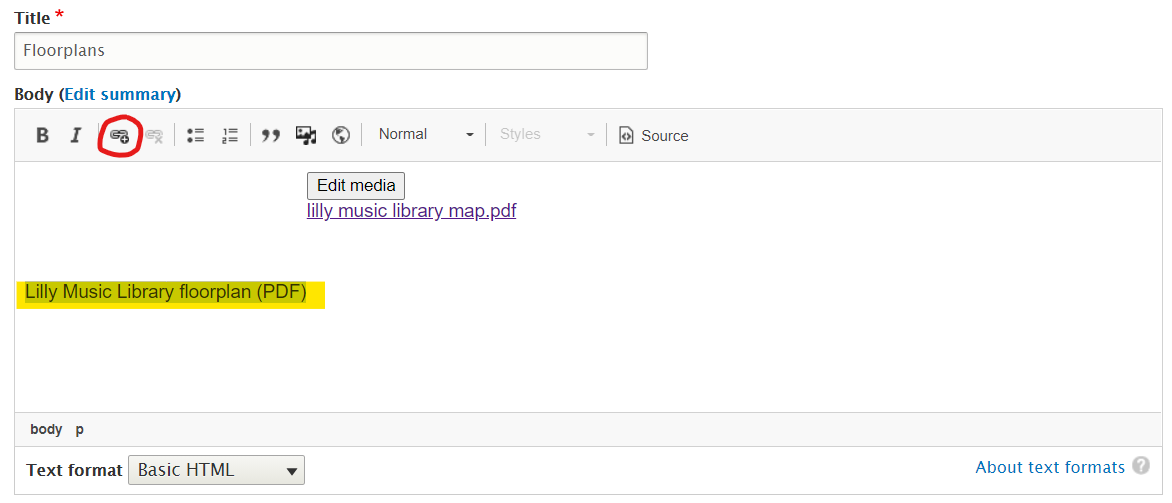
Once you've inserted your image, you'll return to the text editor. There will now be an "Edit media" button next to your image. Click this button to center, left align, or right align your image, or to add a caption underneath.
Note that there is no way to resize your image using the editor on the site. Make sure to edit your image in Photoshop or any other image editing software to be the size you want prior to uploading it to the site.
Documents
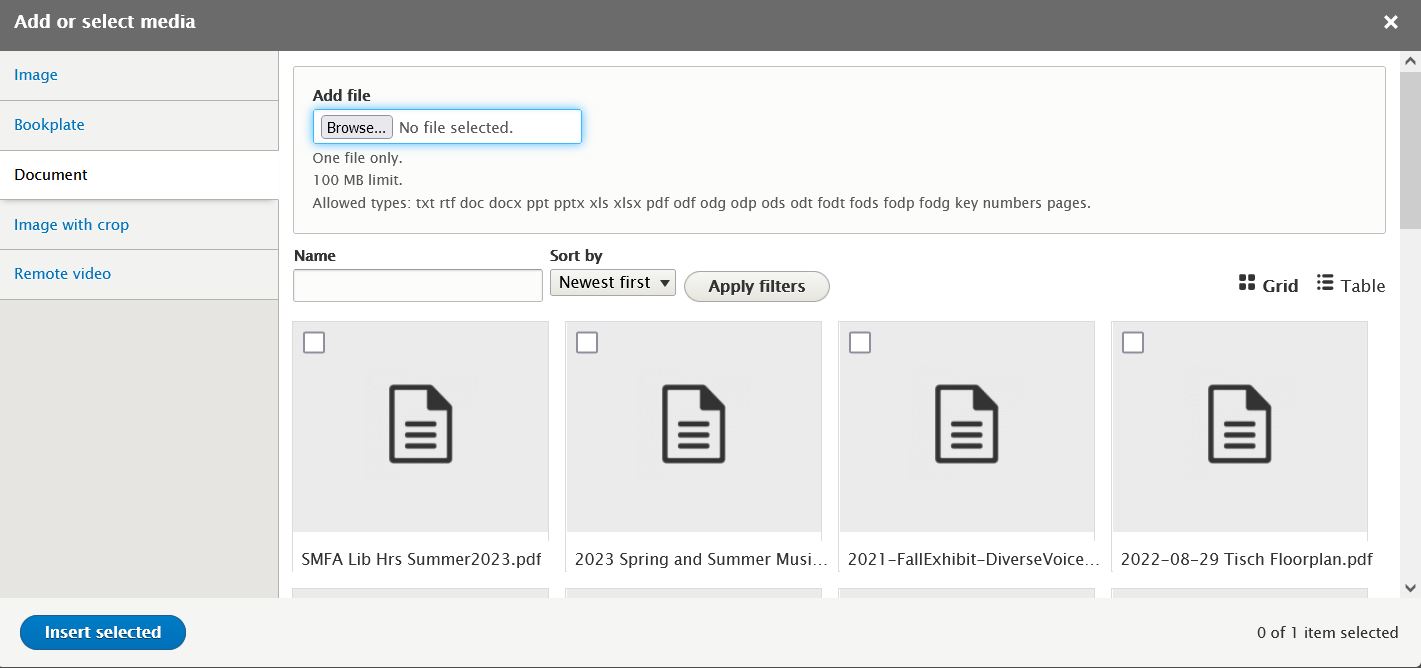
To insert a document, select the Document tab. If the document you want to use has already been loaded into the website, select it from the gallery and click the Insert selected button.
If your document isn’t already there, click the Browse... button to upload it. Then select your document from the gallery.
This will insert the document onto your page as a link, with the filename & extension of the document displayed as the link text.
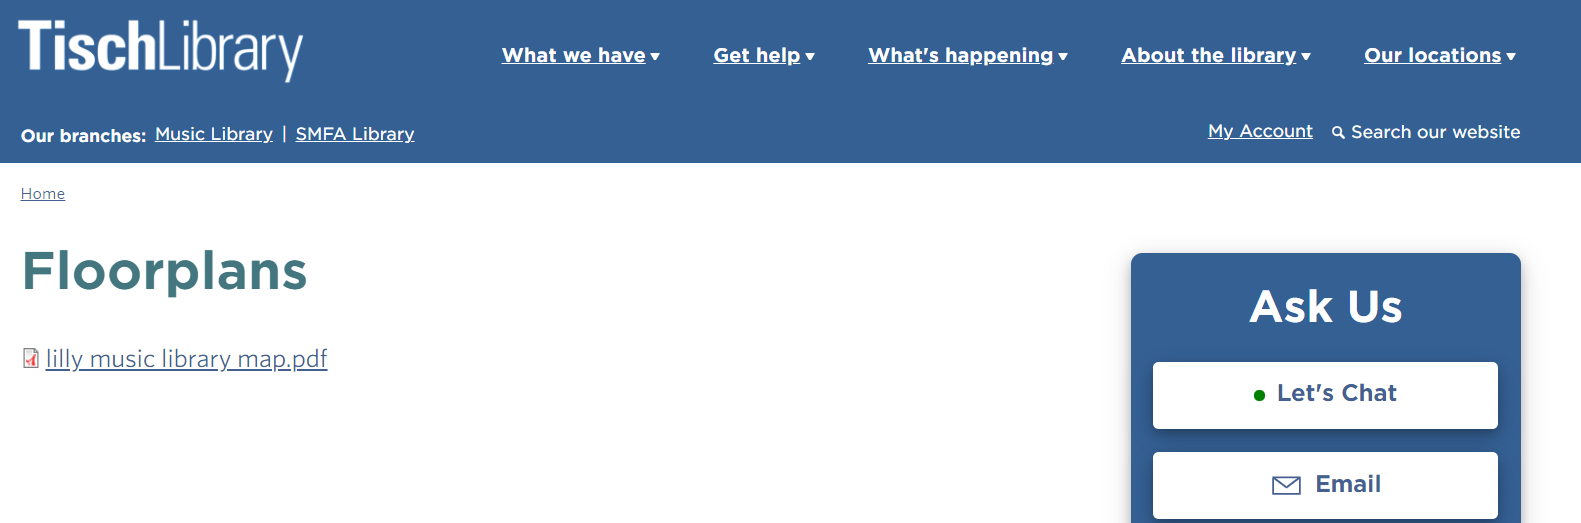
To write the text of the link yourself instead of having the filename & extension display (for an example of documents inserted like this, see the top of the Floorplans page):
- Add your document to a page as above
- Save the page and view the page while not in editing mode
- Right-click on the document link and select "Copy Link" or "Copy link address" (this will vary depending on your browser). It should look like: https://tischlibrary.tufts.edu/sites/default/files/2021-08/lilly%20music%20library%20map.pdf
- Click the Edit tab to return to editing mode
- Write the text that you'd like to use for the document link. Be sure to include what document type is. For example: Lilly Music Library floorplan (PDF)
- Select that text and add a link
- Enter everything after .edu from the link that you copied in step #3. In the example above, you would use /sites/default/files/2021-08/lilly%20music%20library%20map.pdf as the link
- Delete the document inserted in step #1, leaving you with your linked text pointing to the document
Remotely-hosted videos
To insert a remotely-hosted video, select the Remote video tab. This will embed a video onto your page from YouTube or Vimeo. To embed a video from another source, see the iframe section below.
Web Team is currently working on creating a Vimeo account that Tisch staff can use to host videos that will be embedded in the website. If you need to upload a video to appear on the site, get in touch with us.

If the video you want to use has already been loaded into the website, select it from the videos in the gallery and click the Insert selected button.
If your video isn’t already there, enter the URL to your YouTube or Vimeo video and click the Add button to upload it, and then click Save. Then select your video from the gallery and click the Insert selected button.
Inserting iframes
An iframe allows you to embed content from another site within the Tisch site. This may be used for content such as forms, videos, maps, calendars, etc. See the Directions & Parking page for an example of a Google map, or the 3D printing request form page for an example of a Qualtrics form.
To use an iframe:
- Select the iframe button in the WYSIWYG editor (labeled #6 in the WYSIWYG editor screenshot at the top of this page)
- Enter the URL for the content you want to embed. Note that if you have a widget code that you’ve copied from a site (like Google Maps), instead of pasting the entire widget code into Drupal, you need to copy and paste just the URL
- So if you have this code from Google Maps: <iframe src="https://www.google.com/maps/embed?pb=!1m14!1m8!1m3!1d23568.0905476181!2d-71.118877!3d42.406204!3m2!1i1024!2i768!4f13.1!3m3!1m2!1s0x0%3A0x46a463527f2c5835!2sTisch%20Library!5e0!3m2!1sen!2sus!4v1626721458068!5m2!1sen!2sus" width="600" height="450" style="border:0;" allowfullscreen="" loading="lazy"></iframe>
- You’ll just take the https://www.google.com/maps/embed?pb=!1m14!1m8!1m3!1d23568.0905476181!2d-71.118877!3d42.406204!3m2!1i1024!2i768!4f13.1!3m3!1m2!1s0x0%3A0x46a463527f2c5835!2sTisch%20Library!5e0!3m2!1sen!2sus!4v1626721458068!5m2!1sen!2sus part and put that in the first URL field
- Adjust the height and width as needed to fit your content on the page. Keep in mind what it will look like on a smaller mobile screen
Give the iframe a title, which is important for accessibility
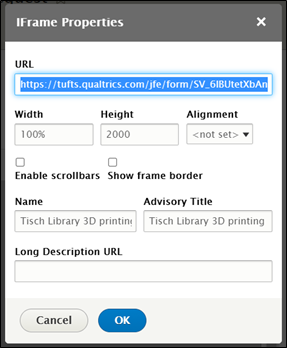
- Click OK
Creating anchors
An anchor tag or anchor link links to a location within the same page (the Faculty & Instructors page is an example of a page using anchors). Anchors are useful on longer pages for directing users to a particular section of the page.
To create anchors, follow the steps below. It may also be helpful to look at the HTML of a page on the site that already uses anchors, and copy the formatting from there:
- Enter your text in the Body of the page
- Using the button in the menu bar at the top of the text editor (labeled 9 in the WYSIWYG editor screenshot at the top of this page), switch to Source view to see the HTML for the page
- Create anchor tags for the location(s) you’d like to link to (see steps 1-3 on How to Create a Link to Jump to a Specific Part of a Page)
- At the top of the page, create a list of links to the anchors you’ve just made (see step 4 on How to Create a Link to Jump to a Specific Part of a Page)
- Click Source to switch back to the WYSIWYG editor
Add bullets to your list of anchors. It will look like this:
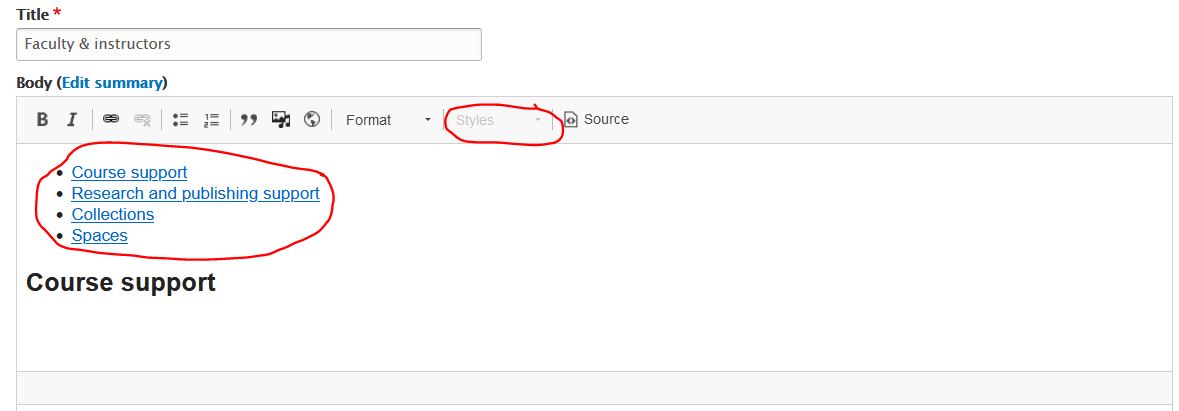
- Highlight your list of anchors. The Styles option will switch from being grayed out to being a drop down menu.
- Choose “Anchor links” from the drop down menu. The links won’t appear to change in the Edit view, but once you save your content and look at the published view, the anchors will be styled
Return to Table of Contents